Search This Blog

Wednesday 29 February 2012

Strawberry Jam


I love strawberries. But I normally don't buy them. I mean I don't buy them as part of our weekly grocery from the supermarket. There are two reasons for that. The are over priced and they taste nothing like strawberries! So don't judge me for not willing to pay a hand and leg for something that taste slightly worse than rubber. So we just get strawberries when we go for fruit picking at a farm or from the farmer's market or from a super market (yes I know....) when my hands are itching to try out a new recipe. Since it's a not a nice fruit picking weather yet and I saw strawberries in abundance at the local Tesco for just £1 per box I thought I'll give then a shot.

Verdict : Exceptionally sweet & juicy strawberries. Tesco never stops to amaze me...impressing me again just when I thought I'll give up shopping at Tesco :).


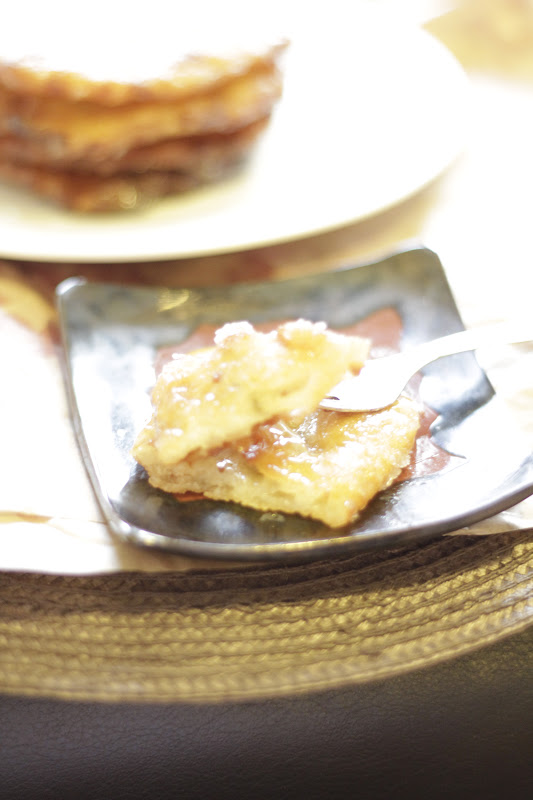
Nobody in my house is a ''Jam'' person. Not even Little T. She loves strawberries though. The only jam we all love is the Kissan mango jam :D. But I had this Strawberry Jam at my friend Monica's house when we were in Kolkata and I loved it. By ''Loved it'' I mean I was licking a spoonful of jam every now and then. She made it at home and it was OUT-OF-THIS-WORLD! Trust me! She gave me the recipe quite sometime back and as soon as I saw the strawberries at Tesco I couldn't stop myself from craving for that spoon licking kind of jam again. 
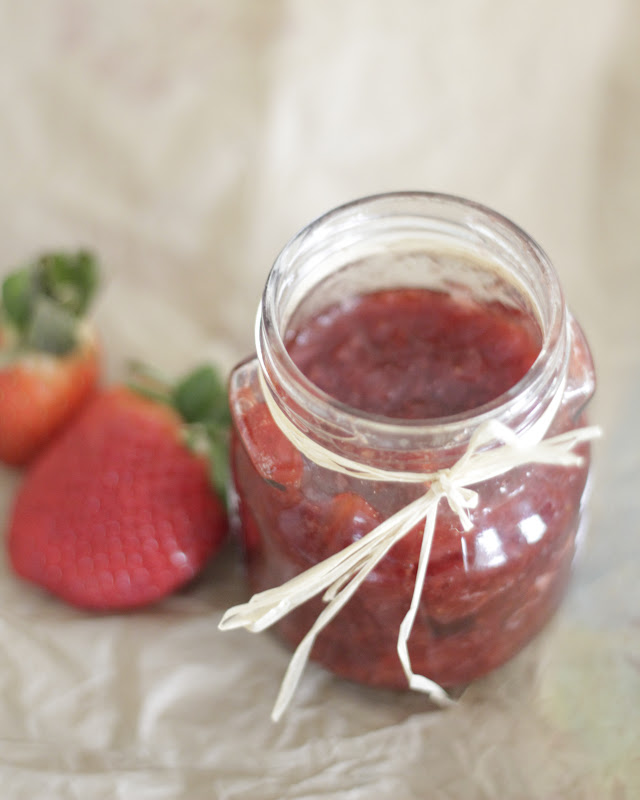
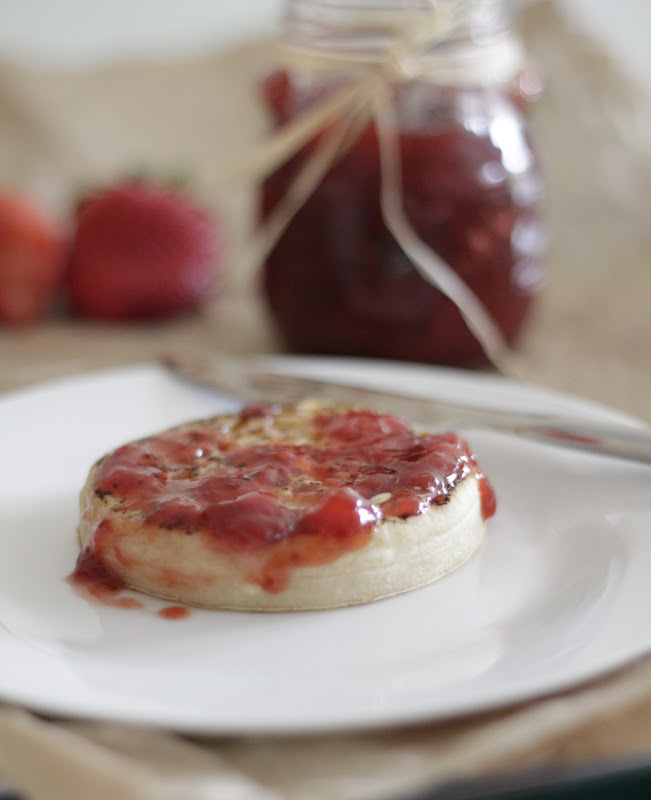


Strawberry Jam

Ingredients : 

Large juicy strawberries - 600 gm (will be enough to make a small jar like in the picture)
Sugar - 2 tbsp + 2 cups (more if the strawberries are not sweet enough or as per your taste)
Water - 1 cup
Juice of 1 lime
Bark of Cassia or Cinnamon Stick - 1 inch 

Method : 

Roughly chop the strawberries and place in a saucepan. Sprinkle 2 tbsp of sugar and the lime juice. Mix well with a spoon and mash up a little with your fingers. Keep aside for 10-15 minutes.


Add the cassia or cinnamon sticks to the strawberries and put the pan on flame and start stirring slowly. Once the sugar has melted add the water and bring to boil, stirring carefully so that it doesn't burn. Lower the heat and simmer for 15-20 minutes stirring continuously and watching it like a hawk...quite literally!


Once the quantity is reduced to half it should be done. Do a quick test by placing a spoon of jam on a cold plate and keep in the fridge for 5 minutes. If it's set and doesn't move much when you tilt the plate it's done. If not then put it back on heat for 5 more minutes and do a test again. 

Once it's done cool it down and pour in a sterilised glass jar. It can be kept in the refrigerator upto a month. Slather on a crumpet and enjoy it the British way! :)


Monday 27 February 2012

Cream of Chicken Soup


Little T : ''Hey What's the big idea?''.....
Mamma : ''???????????????????''
Little T : ''Mamma Mickey Mouse says that!''
Mamma : ''Oh really!!! And what else does Mickey Mouse say?''
Little T : ''We Got ears..say cheers''....
Mamma : ''Does Mickey Mouse only say silly things or does he do some work as well?''
Little T - ''Yes Mamma he uses toodles to help his friends and to solve problems...oh and he does the hot dog dance too'' (at this point she starts singing and dancing to the tunes of the famous Hot Dog song....)
 

 Yes this is what Mickey Mouse and his ''pals'' do in their ''Clubhouse''. And this is how Little T has started talking too lately. I went into a shock when she said ''Hey what's the big idea'' to me for the first time! I love to hear her talk. To just sit down with her and let her talk. It doesn't matter that she still confuses between 'He' and She', 'His' and 'Her'. It doesn't matter that she understands Bangla fully but is not confident enough to speak in it. I love her sudden expressions that she picks up at school or from the cartoons she watches. I love how she sometimes tells me suddenly that she loves me and missed me at school. And I love to do stuff with her. It's the best part of my day. We bake, we dance, we paint and we cook. I try and tend to cook easy child friendly recipes for lunch so that she can help me with the chopping and stirring. Hence we end up cooking this version of Cream of Chicken Soup quite often. I add whatever vegetables are lying around in my fridge to make it as healthy as possible. 


Cream of Chicken Soup

Ingredients : 

Boneless Chicken Breast - 1 (about 200 gm) boiled and shredded, stock reserved
Carrots - 2 small, diced
Celery - 1 diced
Mushrooms - 4 large chopped
Spring Onions - 4 chopped
Garlic - 1 clove, crushed
Oilive Oil - 1 tbsp
Butter - 1 tbsp
Flour - 2 tbsp
Chicken stock - 1 pint(make with granules) + the boiled chicken stock
Dried Thyme - 1/2 tsp
Salt to taste
Black Pepper - 1/2 tsp crushed
Double Cream - 60 ml

For the Croutons : 

Ciabatta Bread - 6 thin slices cut into 1/2 inch cubes
Olive oil - 2 tbsp
Dried Thyme - 1 tsp
 
 Method : 

In a large sauce pan heat the oil and butter together. Add the garlic and chicken and fry on high heat till the raw smell of the garlic is gone.  Add all the vegetables cook on low flame. 

Add the mushrooms and continue stirring till mushrooms and other vegetables are tender. Stir in flour until well blended. 

Add both the chicken stocks and thyme. Stir well while bringing the soup to boil. Cover,  reduce heat and simmer till the vegetables are tender. Uncover and season with salt and crushed black pepper. 

Remove from heat and stir in the cream. You can either serve the soup now as a chunky soup or put it in the blender and pass it through a strainer. If you are blending and straining then make sure you reheat the soup before serving.  

Meanwhile, to make the croutons, mix olive oil and thyme in a mixing bowl. Add the bread cubes and toss until they are coated well with the oil mixture. Spread on a baking sheet and bake in a preheated oven for 10-15 minutes until golden and crisp, turning them over halfway through cooking. 

Serve the soup with some croutons and crusty bread.


Wednesday 22 February 2012

Dahi Hariyali Murg - Chicken cooked with yogurt and greens


We are waiting eagerly for spring now. We've had enough of the bitter winds, gloomy greys, dark afternoons and black slushy leftover snow! It's time for some colours now. Some bright yellow sunshine, green shiny baby leaves  and swaying colourful daffodils, poppies and tulips will be nice. I found some new daffodil and tulips coming out from their bulbs already in my backyard today. It's like Nature's getting a makeover overnight! And I got some peonies to plant as soon as it gets a bit warmer. 

To enjoy forthcoming spring I thought of adding some colour to my food. Colour as in completely natural stuff. I wanted to make a nice hearty green dinner, but wasn't in a mood to eat salad or soup. Searched my favourite blogs and came across this Dahi Methi Murg on Soma's fabulous creation eCurry. Her pictures always leave me drooling all over and crave for the dish badly. This is one of those recipes! The husband is not very fond of fresh fenugreek so I made a few changes of mine and called it Dahi Hariyali Murg. Quite a grand name for such a simple dish I must say. But nobody will believe you if you tell them exactly how simple this dish is. Thank you Soma again for another gorgeous dish!


Dahi Hariyali Murg - Chicken in Green Yogurt Sauce


**Note - You can add 1 tbsp of corn flour to stabilize the yogurt before adding it to your dish. I've never had any problem with curdling, hence I never use it. But if you've had this problem in the past then it's recommended that you stabilize the yogurt before adding it to the curry.**


Ingredients : 


Chicken - 1.5 kg , thighs and legs (skin off, wash and pat dry with a kitchen towel)

For the marinade - 
Lime/Lemon juice - 2 tbsp
Onion - 1 small, chopped
Minced Ginger - 2 tsp
Minced Garlic - 2 tsp
Hot Green Chillies - 3-4 (More or less depending on how much heat you can handle)
Salt - 1 tsp

For the Gravy - 

Sugar - 1/2 tsp
Onions - 2 large, thinly sliced
1 + 1/4 cup thick strained yogurt (Donot strain the yougurt if you are using Greek style)
Fresh Corriander leaves -  1 cup, chopped
Spinach leaves - 1/2 cup, chopped, blanched and pureed
Dried Fenugreek leaves(Kasoori Methi) - 2 tbsp
Red Chilli Powder - 2 tsp (Kashmiri chilli powder will give a nice colour without making it too hot)
2 tbsp ghee + 4 tbsp oil
Garam Masala - 1 tsp (optional - I didnot use it)

Dry Spices for tempering : 

Green Cardamom - 5-6
Black Peppercorns - 4-5
Cinnamon - 2 inch stick
Bay Leaf - 1


Method : 

Cut 2-3 small slits on the chicken pieces. Toss them with the lemon juice, half of the chilli powder and salt and keep aside for 20 minutes.

Grind everything under ''Marinade'' into a fine paste. Combine half of this paste with 1 cup of yogurt and marinate the lemon juice coated chicken pieces with this mixture. Coat all the pieces well. Keep marinated for a few hours.

Heat ghee & oil in a wide bottomed pan. Add all the ingredients under ''Tempering'' and let them sizzle for a few seconds without burning them. Add the onions, ginger-garlic-onion paste and sugar and fry till the onions start changing colour into a light golden brown. Once the onions cooked nicely the oil will separate.

Add the blanched and pureed spinach and cook the masala on high heat till oil separates again. Make a well in the middle of this masala paste and place the chicken pieces at the bottom, making direct contact with the bottom of the pan. This will help to brown the chicken pieces nicely. 

Mix the rest of the marinade and the dried fenugreek leaves with 1/4 cup of yogurt and 1 cup of water and keep aside. Cook the chicken on high heat, keep on tossing the chicken pieces around so that they don't burn. Let the oil separate again. Take the pan off heat and add the yogurt mix and corriander leaves and mix well. Cover and cook on medium heat till the chicken is cooked thoroughly and tender.Uncover and simmer for 10 minutes to let the extra liquid to evaporate. I did this on high heat to dry it up completely. Adjust salt and add garam masala if you are using it. 

Serve hot with Pulao or Indian flatbreads. 


Tuesday 21 February 2012

Malpoa or Malpua - An Indian Pancake


Sheer goodness! I like to call Indian desserts like this one by this name. They are delicate, unbelievably tasty and they leave a smile on your face. What else do you need from the last course of your meal? I've been in love with Malpuas (or Malpoas like we Bongs call them) all my life and can literally eat every variations and live on them. I don't make them too often because of the sugar content but when I do everybody in my family is allowed to binge on them. They last only a day so we just ignore the sugar rush and calorie content for that one day!

Little T's school wanted to celebrate Pancake Day and everybody had to take some kind of Pancakes for their Snack time at school. Hence I made the very Indian version of pancakes. Little T and her Mommy like their Malpoas crispy while Dadda likes them lightly brushed with thick syrup, thus giving it a crisp toffeed taste and appearance.


Malpoa/Malpua - Indian Style Sweet Pancakes

Recipe by my Mom-In-Law

*Note - You can add grated coconut, ripe mashed bananas, raisins, crumbled Kalakand or even pineapples to the batter. I've made a more authentic Bengali variation.*

Ingredients : 

For the Malpuas : 

Plain flour - 100 gm
Fine Semolina - 75 gm
Whole Milk/Full Fat Milk - 320 ml
Granulated Sugar - 50 gm (double the amount if you are not brushing or dunking your malpuas with extra sugar syrup)
Fennel Seeds - 1 tsp
Oil to fry

For the Syrup :

Sugar - 1 cup
Water - 1 cup 
(Basically the ratio needs to be 1:1 no matter how much sugar you are using)
Crushed Cardamom pods - 3-4

Method : 

Make the sugar syrup by heating the sugar and water together in a pan and reducing the amount to an one string consistency. Add the crushed cardamoms, mix well and keep aside. 

Mix all the ingredients for the malpuas together and keep aside for 1-2 hrs. 


Heat oil in a deep bottomed Kadhai. Give the batter a good whisk again. Deep fry the pancakes by adding half a ladle full at a time. Fry both the sides till golden in colour. 


Remove and place on a bowl lined with kitchen towels to soak extra oil. Slowly brush the Malpuas with the syrup or give them a quick dunk in the syrup one at a time.

Serve them warm or cold.


Happy Pancake Day to all my readers :).

**Shrove Tuesday (also known as Pancake Day) is the day preceding Ash Wednesday, the first day of Lent. Shrove Tuesday is observed mainly in English speaking countries, especially Ireland, the United Kingdom, Australia and New Zealand and Canada but is also observed in Philippines and Germany. Shrove Tuesday is linked to Easter, so its date changes on an annual basis.

In most traditions the day is known for the eating of pancakes before the start of Lent. Pancakes are eaten as they are made out of the main foods available, sugar, fat, flour and eggs, whose consumption was traditionally restricted during the ritual fasting associated with Lent.- Wiki **

Monday 20 February 2012

Basic Tomato Pasta Sauce


I love fresh tomato sauce to accompany my pastas, fish, meat or even just to dunk my breads in. I normally make mine in a large quantity and batch freeze them in plastic containers and it helps a lot when I have to fix a quick meal for friends or family. And this is a sauce that I cannot do without. I use this basic sauce to make my Chillies, Lasagnas, Bolognese, Pizza topping to name a few. I adapted my recipe from Jamie Oliver's recipe quite some time back and have never looked back since then. No matter what I can always offer my sudden guest a bowl of pasta bolognese for supper. :)

Ingredients : 

4-5 tbsp of extra virgin olive oil
Onion - 1 large peeled and evenly chopped
Garlic - 3-4 gloves crushed
Canned plum or chopped tomatoes - 3x400gm cans
Fresh Basil Leaves - a handful, torn
Dried Basil - 1 tsp
Dried Marjoram - 1 tsp
Salt to taste
Ground Black Pepper - 1/2 tsp


Method : 

Heat the olive oil in a wok. Add the onions and garlic and fry on medium heat till they start changing colour. 

Add the fresh basil leaves and tomatoes and move around. With the back of a wooden spoon/spatula mash and squash the tomatoes as much as you can. 

Add the dry basil, marjoram and mix well. Season with salt and pepper. Take the wok off heat as soon as it reaches boiling point. Pass it through a coarse sieve in to a bowl, using the spoon to pass the larger bits of tomatoes and onions through as much as possible.

Discard the basil and garlic. Scrape the tomato from the back of the sieve into the bowl too. Bring the sauce back to boil and check seasoning. This consistency will be perfect for bolognese sauce and spreading on pizzas. For Chilli con Carnes you'll have to loosen up the sauce by adding more water to it. Check seasoning every time you loosen up the consistency. 

Store it in an airtight glass jar and it will keep upto a week in a fridge. Or divide the sauce equally into plastic freezer safe containers or zip lock pouches and freeze them. 


Friday 17 February 2012

Posto Murgi - Chicken in Poppy Seed Gravy


We are enjoying half term holidays now. By enjoying I mean taking a break from walking in the horrible cold outside to school every morning, watching day time tv, painting and doing stuff together. I love these holidays. I love every single second of my time I get to spend with my baby. Though she hates being called a baby now. And to be very honest she is indeed  growing up super fast. From not being able to talk properly last year this time she has gone into writing words and spelling words using phonics. Last Friday, the last day before the holidays, upon asked how she's going to spend her holidays she told her teacher that she'll be going to her ''Mummy House'' (she calls my Mom-in-Law Mummy as we all call her that...and Mummy's home is Mummy-House) in an aeroplane to spend time with Little A(her cousin brother). 

The teacher was very happy to know later on from me that she isn't saying what we told her and instead using her imagination to create a story about her holidays. She even told them that there are lots and lots of people in the house(she meant the orderlies but her teacher was a bit shocked I think) and everybody plays with her. When I asked her about it at home she sounded a bit sad and that's when I realised that she was missing her family. Somehow she has started to understand and relate holidays with family time as we used to do when we were small. Holidays for me and my brother meant going to 'Mamar Bari' (Maternal uncle's house) and spend two marvelous weeks with the cousins. Little T loves her cousins, especially my Sis-In-Law's younger one Little A who is also about the same age as she is. Even though they don't get to see one another as often as they would desire, they love each other to bits and cannot do without talking to each other over the phone almost every week. Little T won't buy anything until we buy the same one for her brother and he does the same.

I love Mummy's cooking. In fact I owe her mostly for my cooking skills. Since I didn't know my lentils from my spices when I got married she took it upon her to teach me, guide me and help me, especially also because she knew how painfully fussy her son was when it comes to food! She was my Google for searching for recipes 7years ago and still is. She is an amazing cook who knows how to pick the simplest of ingredients and turn them into a tasty yet healthy meal! Thank you Mummy for everything :). This recipe for Posto Chicken is her speciality. I've made it a thousand times and though everybody else raves about it my husband simply just says ''It's still not like Mummy's'' and though I'm not very happy about it I will admit it isn't!


**Note : The traditional and ideal way to grind poppy seeds is with a Shil Noda(Indian Stone Grinder) as only that can give you a fine sweet paste. Trying to grind or blend poppy seeds in a mixer grinder makes it bitter as it takes longer to grind. I use my shil noda to grind mustard and poppy seeds but you can grind poppy seeds using a blender or a coffee bean grinder. If you are using a blender then just soak larger amount (about 6 tbsp) in warm water for a few hours and then wet grind it with the spice/chutney attachment of your mixer. 

If you want to use the dry grinder/coffee grinder then dry roast about 3 tbsp and dry grind it. This will give a slightly different taste but shouldn't matter. 


Posto Murgi - Chicken in a Poppy Seed Gravy


Ingredients :

Dry Spices :

Green Cardamom - 5
Cloves - 4
Cinnamon - 1/2 " stick

Cumin Seeds - 2 tsp

Chicken - 1.5-2 kg, preferably small-medium thighs and legs, skinned
Yogurt - 2 cups
Onions - 2 large, grated or minced
Ginger Paste/Mince - 2 tbsp
Garlic Paste/Mince - 2 tbsp
Chilli Powder - 1 tsp
Salt to taste
Bay leaves - 2 large
Poppy Seeds - 2 tbsp soaked and ground into a fine paste (See Note...use 2-3 tbsp of the end product in both cases)
Sunflower Oil to cook - 6 tbsp
Ghee - 1 tbsp (optional)

Method : 

Dry roast and grind the first 3 ingredients listed under the dry spices. This will give you 'Bengali Garam Masala'. I normally do 10 times of this quantity and store it in a spice container for everyday use.

Dry roast the cumin seeds separately and grind into a fine powder. I normally dry roast a whole 100gm bag of cumins and store for everyday use. 

Wash and clean the chicken pieces. Dry lightly with a kitchen towel. Prick with a fork all over. 

Whisk the yogurt together with the minced onions, ginger, garlic, salt and half of the cumin powder. Marinate the chicken pieces with this mix for a few hours, preferably overnight.

Heat oil in a deep wide wok. Add the bay leaves and let them sizzle for a few seconds. Start adding the chicken pieces after scraping excess marinade. Add the marinade and cook on high heat. 

A lot of water will be released initially but on high heat it will slowly start to evaporate. When all the water has dried up the raw smell of onion, ginger and garlic should be gone and oil will separate. 

Add the chilli powder and rest of the cumin powder and continue to cook on high heat. This is when the chicken will brown on both sides instead of at the beginning in most other recipes. Add splashes of hot water, bring down the heat, cover and cook till the chicken pieces are tender and thoroughly cooked. 

Add the poppy paste and salt if required. Mix well. Sprinkle the garam masala before getting it off the heat and spoon in the ghee if using. Serve hot with steamed white rice, Mishti Pulao or parathas.

Cook's tip : Add a sliced boiled egg as garnish. The egg yolk mixed with the poppy seed gravy gives an irresistible taste and texture.


Tuesday 14 February 2012

Zebra Cake


I was going through a couple of books on baking and desserts today at the library when I saw a picture of a Zebra cake. It was love at first sight. It was BEAUTIFUL! An elegant vanilla cake with dark chocolate stripes. Pretty as a picture. I just stared at the picture for a couple of minutes and then hurried out of the library after collecting my reluctant daughter and the thousand other things only a mom has to carry everywhere. I didn't even bother to renew the books or even borrow the new ones I've kept in my basket. I just knew that I had to rush home and bake this cake. It's one of those crazy baker instincts that we get sometimes....some of you will know what I'm talking about!

The recipe for this cake is very VERY simple. I adapted it from the BBC Good Food website. You'll find the original recipe here.


Zebra Cake - Another Choc-Vanilla Marble Cake


Ingredients : (Makes enough for a 20cm cake tin...double the quantity for bigger tins)

Self Raising Flour - 225 gm
Caster Sugar - 225 gm
Butter - 225 gm
Eggs - 4
Vanilla Extract - 1 tbsp
Cocoa Powder - Dark Variety, 2 tbsp
Milk - 2 tbsp or more in case you want to loosen up the batter


Method : 

Pre-heat oven to 180d C.

Put all the ingredients except the cocoa powder in a blender and whisk/whizz for 2 minutes. Add a couple of tablespoons of milk more to loosen up the batter is required.

Spoon out the batter in two bowls in equal amounts. Add cocoa powder to one of them and mix well.

Butter and line a 20cm round cake tin. Start with adding two dollops of dark batter right in the center of the tin. Add two dollops of white batter in the center of the tin on top of the dark batter. Top it up with two dollops of dark batter and so on. DO NOT try to spread the batter out it will spread out on its own. 

It should look like this after all the batter's used up.


Bake in the oven for 45-50 minutes (more for larger cakes). Insert a toothpick or a skewer and if it comes out clean then it's done! Turn it out on a rack to cool after 5 minutes.


Do we need a special day for love? Why not! If we can have a Mother's Day, Friendship Day, Father's Day or even days as silly as Chocolate Day or even International Pajama Day (yes it's true...Google it!) then what's the harm in expressing your love without any boundaries! I think it's a great idea and another day to go shopping and exchange gifts ;).


Monday 13 February 2012

A Citrussy Chocolate Mousse


I don't like citrus fruits in my dessert. Period. That's the reason why I don't eat orange flavoured chocolates, Lemon tarts, Lemon drizzle cakes, Lemon cheesecakes etc etc. I don't even make them very often unless I absolutely have to. Having said that I must also admit that I love clementines and lime. I absolutely adore their taste, texture and the vibrancy they add to my life. Clementines are sweet, juicy and they are always found in abundance! 


I have been meaning to make a chocolate dessert for the Valentine weekend (there was this Chocolate Day too!) and after I stumbled upon Soma's recipe of an Orange Scented Chocolate Mascarpone Mousse I thought I'd give it  go. It was an instant hit. I replaced the orange bit with clementines and lime and the mascarpone with marshmallows and they made a perfectly delectable citrussy dessert. And the best part is it's eggless and can be whipped up in no time!


A Citrussy Chocolate Marshmallow Mousse 


I combined two recipes to make this mousse. You'll find the Orange Chocolate mousse at Soma's blog here and the Chocolate Marshmallow Mousse at Ria's blog here. And here's how I did it. :)

Ingredients :

Dark/Milk Chocolate - 250gm (I used Milk Chocolate so that Little T can eat it too), chopped in small pieces
Mini Marshmallows - 150 gm
Butter - 50 gm, softened
Hot water - 60 ml
Cream  - 284 ml
Orange/Lemon/Lime Extract - 1 tbsp
Chopped nuts of your choice to garnish
Chopped clementines to garnish


Method :

Combine the chocolate, marshmallows, butter and water in a glass bowl and melt everything together by placing the bowl on a pan of boiling water. Make sure the water level doesn't touch the bottom of the glass bowl. Mix well until everything has melted and is of a thick consistency. Cool it down to room temperature.

Add grated orange/lemon/clementine zest and the extract to the chocolate mixture and fold in nicely.

Whip cream till soft peaks rise. Fold in the chocolate mixture and combine everything nicely using a wooden spoon. Scoop into individual ramekins or dessert bowls, cover with cling film and place in the refrigerator to set for 1-2 hours. 

Garnish with chopped nuts and clementines before serving.


Sunday 12 February 2012

Sandeepa's Mutton Rezala


My Ma was never up for us having any meal outside in a restaurant. She used to snigger at every proposal of dining out and used to say ''I'll make better food at home'' and fortunately (or unfortunately) she did! One of my all time favourite dish is Mutton Rezala that old places like Aminia and Sabir used to make. And my Ma used to make one at home too. I remember eating rezala once at Aminia when I was little and I was all praises about it at home. And the next Sunday I got a hot bowl of Mutton Rezala waiting for me at the dinner table with a customary 'Rumali Roti' to dunk in the heavenly stew. And since then it was a regular affair. Infact her rezala became quite popular among our family and friends. Whenever anybody visited or ate at our place they politely demanded a bowl of Mutton Rezala. And the memory of the heavenly smell in our home on those occasions is still fresh in my mind. But I never bothered to make it in my kitchen. Somehow I had this idea that this dish requires a lot of hard work, time and patience...none of which I possess! Until , of course, I came across this recipe on Sandeepa's blog. Her blog has been my inspiration for some time now. Her recipes and anecdotes are simply mind blowing!

Coming back to the recipe, this is one of the easiest mutton recipes ever! It doesnt take up my time as I slow cook it in a cooker and yes as Sandeepa says it does taste and smell heavenly! I simply love it for the taste and for giving me back my childhood days! 

You'll find the original recipe here at Bong Mom's CookBook. And here's how I did it...

Mutton Rezala


Ingredients : 

Goat/Lamb Meat - 2kgs
Onions - 3 large, sliced 
Ginger Paste/Mince - 2tsp
Garlic Paste/Mince - 2tsp
Yogurt - 1 cup for marinade + 2 cups for cooking

Spices you'll need for roasting and grinding :

Cardamom - 4 big black & 20 green
Mace Flowers - 2
Clove - 10
Pepper Powder - 1 tbsp

For the Gravy : 

Cashew - 4 tbsp, soaked in water for a few hours and blended into a fine paste
Kewra Water - 1 tsp (Can be replaced with Rose Water)
Milk - 2tbsp
Saffron Strands - A generous pinch, crushed (just crush with fingers, this will mix well and give a better flavour and aroma)
Salt to taste
Sugar - 1 tsp
Sunflower Oil - 4 tbsp
Ghee - 4-5 tbsp

Whole Spices for tempering :

Bay Leaf - 5
Dried Whole Red Chillies - 10 
Black Pepper Powder - 1 tsp
Cardamom - 2 black & 10 green
Clove - 15
Cinnamon Stick - 4


Method : 

Roast and grind all the spices listed under ''Roasting and grinding''.

Soak the saffron in the milk and heat in the microwave for about 20seconds. 

Heat 2 tbsp of oil and 1 tbsp of ghee. Fry onion slices till they are translucent. Add the ginger and garlic pastes and fry well till the raw smell is gone. Cool a bit and blend in a blender into a paste.

Marinate the meat with this paste, ground dry spices, salt and 1 cup of yogurt. Keep in the refrigerator for 3-4 hours atleast, overnight is better.

Heat the remaining oil and ghee in a deep wok. Add the spices for ''Tempering''. Add 1/2 tsp of sugar. 

Fry the meat pieces in the oil after scraping the excess marinade off the pieces. Fry them till they are nicely browned on both the sides. As Sandeepa says...'' A lot of water will be released and it will smell heavenly''....so true!

Whisk the remaining of the marinade with 2 more cups of yogurt, cashew paste, water (depending on whether you want it thick or soupy) and season with salt according to your taste.

Add this to the wok and bring it to boil. Por it into the slow cooker pan along with the Kewra Water and cook it on high for about 3 hours and on low for 1 hour. (Adjust cooking times according to the meat pieces and quantity). You can also cook it in a pressure cooker. I've cooked this dish in both and slow cooking definitely makes it so much better! Stir in the the saffron milk just before serving.

Serve it with Biryani or Naan/Tandoori Roti/Rumali Roti.


Tuesday 7 February 2012

Superquick Portugese Liver


Finally Britain got some good snow last weekend. People went crazy with happiness and for a couple of days all we saw on Facebook were updates from everybody in the form of photos, status updates etc about how everyone was enjoying and loving the snow. We had a super fun day, or rather a super fun night too. We had guests over and we're all having a nice time drinking and enjoying the lovely glistening whiteness outside.

Little T was too excited to go to sleep. So her dad took her outside for a little promo of what she'd get the next morning. The promise of a Snowman was good enough to satisfy the little one and put her to sleep instantly. And the promise of a clean shoveled driveway was good enough to cook this Portugese style Liver for DH. He should've been a politician I tell you! Anyway I made this liver for the first time. I was in no mood to look up for recipes or stand there for ages and make a difficult one. I just kept on adding stuff from the fridge and at the end got this dry spicy curry like thing which was yummy. I'm calling it Portugese as I used the Nando's Peri-Peri sauce and hell Nando's is Portugese isn't it? :)

I didn't get the chance of getting it out or style it and take some decent pictures. So you will just have to trust my words when I say this was awesome. 


Portugese style Liver Curry 

Ingredients : 

Fattened Duck or Chicken Liver (aka Foie Gras) - 250 gm , diced (You can use normal livers too)
Onion - 1, minced
Garlic - 2 cloves, minced
Butter - 3 tbsp
Salt to taste
Nando's Hot Peri-Peri Sauce - 3-4 tbsp (more if you want it hotter)


Method : 

Heat a griddle or a small-ish pan. Melt the butter in it and add the minced garlic. Add the liver pieces and fry it in the butter. With a spoon keep on frying the livers by pouring the hot butter from top(kind of recycling the hot butter in the pan). 

When the liver pieces are just about cooked add the onions and mix well. Add salt and sauce and keep on high flame for a couple of minutes.

**Be careful when cooking liver as over cooking it will make it chewy and inedible.


I love snow. It makes me happy to see all the purity surrounding us. The blinding brightness of the untouched virgin snow followed by happy laughter and an array of snowmen gives me such a serene pleasure, it's almost divine. What a perfect way to commence Charles Dickens' anniversary week! My cat would beg to differ though. I'm sure she wasn't too pleased about snow touching her tummy when she tried to catwalk across it!

Here's a link to my sister-in-law's article this week. Bonne lecture! :)

http://epaper.thehimalayantimes.com/PUBLICATIONS/THT/THT/2012/02/07/ArticleHtmls/Dickens-and-Children-of-Lesser-Gods-07022012017025.shtml?Mode=undefined

Monday 6 February 2012

Chicken Fajitas


Last week was a crazy one. We are both trying to reduce some weight but being food lovers, dieting is out of the question. Hence our dietician made a plan for us which includes quite fancy and tasty foods from around the globe. For instance the Chicken Fajitas. They are wholesome and scrummy, filling yet low in calorie content. We also love it because it gives us the pleasure and distant memories of having a Chicken/Mutton Tikka Kati Roll back in Kolkata!

Fajita commonly refers to any kind of grilled meat served on flour or corn tortillas(Wiki). They are very easy to make and is perfect for a busy weeknight supper. You can mix and match with different ingredients and spices. Serve it with store bought salsa, guacamole and sour cream/yogurt dip or you can make them at home too.

Chicken Fajitas

Ingredients :  Makes 6 fajitas

Boneless Chicken Breats - 500gm, cut into thin  strips
Red Pepper - 1, cut into thin slices (should be of equal size like the chicken)
Orange/Yellow Pepper - 1, same as above
Onions - 2, sliced


Salt to taste
Fajita Spice Mix (Optional) - 2tsp (You can use any other spice mix or even just cumin and corriander)
Paprika - 1/2 tsp or to taste
Olive Oil - 2tbsp
Lime - Half
Corn/Flour/Wheat Tortillas - 6

Method : 


Marinate the chicken, onion and pepper strips with the salt and spice mix and set aside for 20 minutes. 


Heat a griddle. Brush it with the oil. Add the marinated chicken and vegetables and fry on high heat. Move everything around continuously with a tong so that nothing burns. Squeeze the juice of half a lime when the chicken is cooked and take it off heat. Toast the tortillas. Serve the chicken in the hot griddle itself along with fresh salad, guacamole/salsa and sour cream/hung yogurt. Whichever suits you the most...the options are endless! :)

Here are some shots I tried with my new 50mm. I simply heart it! Pardon the light though....did it in a hurry while the starving daughter and husband were banging the plates.